
TLDR
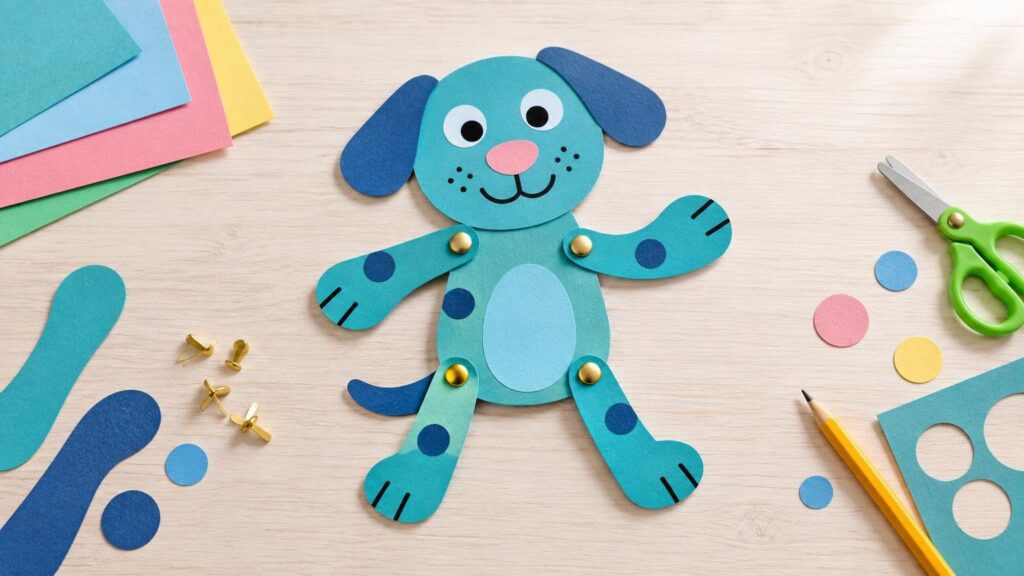
Make one large body, two arms and two legs from cardstock. Place the limbs behind the body, have an adult pierce each joint, and connect the pieces with brads, also called paper fasteners or split pins. Keep each fastener slightly loose so the limb can swing. No printable template or cutting machine is required.
If “easy paper puppets cardstock kids” brought you here, this is the low-pressure version: broad shapes, minimal supplies and no demand for perfectly matched limbs. A monster, robot, bug or alien works especially well because crooked lines and unusual proportions become part of the character.
The project at a glance
| Decision | Simple starting point |
|---|---|
| Suggested audience | A practical starting range is roughly ages 5–8, with the amount of adult help adjusted to the child. |
| Adult help | An adult should make the holes, supervise the fasteners and help with any difficult cutting. |
| Moving parts | Begin with four: two arms and two legs. Use only two arms for an easier version. |
| Mess level | Low. Keep brads and paper scraps in separate shallow containers. |
| Design rule | Use large, forgiving shapes rather than narrow fingers, claws or accessories. |
Brads are small detachable parts. The U.S. Consumer Product Safety Commission says small parts are not permitted in toys intended for children under 3 and advises keeping small-part toys away from children younger than 3. Treat this project the same way: it is not for children under 3, and every loose fastener should remain under adult control. See the CPSC’s small-parts and choking-hazard guidance for the underlying safety information.
Materials for an easy cardstock puppet
- One or two sheets of cardstock
- Four brads or paper fasteners for the basic five-piece puppet
- Pencil and eraser
- Markers, crayons or colored pencils
- Age-appropriate scissors
- A small single-hole punch or pointed hole-making tool for adult use only
- A protective work surface, such as a cutting mat or a thick piece of scrap cardboard
- Optional glue stick and lightweight paper decorations
- Two shallow trays or bowls: one for brads and one for scraps
Use cardstock that the child can cut without struggling. Cricut categorizes 65 lb cardstock as light and 80 lb cardstock as medium, which provides a useful vocabulary even when the project is cut by hand. There is no universal best weight for every brand, pair of scissors or child, so try one large shape before committing to the full puppet. For a closer look at how common weights behave, see this comparison of 65 lb, 80 lb and 100 lb cardstock for paper crafts.
A 65 lb sheet is a reasonable place to begin if easy hand cutting is the priority. Neenah describes its own 65 lb cardstock as durable enough for frequent handling, although that manufacturer statement should not be assumed to describe every 65 lb paper. If your available cardstock bends too easily at the joints, add small reinforcement circles instead of rebuilding the entire character.
Construction paper can be tried when cardstock is unavailable, but its joint durability will vary. Reinforce the area around each hole with a small glued paper circle and let the glue dry before inserting the brad. Paper plates are another useful body option; this guide to paper plates versus cardstock for young children can help you choose between the two materials.
Choose a character built from broad shapes
Start by asking the child what kind of character they want to move. Good prompts include a dancing monster, marching robot, flapping bird, four-legged dinosaur, waving person, butterfly, beetle or friendly alien. The easiest design is one that still looks complete when reduced to a few big pieces.
For the standard five-piece base, draw one combined head-and-body shape, two arms and two legs. The body might be an oval, rounded rectangle, triangle or bean shape. Arms and legs can be strips with rounded ends. Avoid skinny joints because there needs to be enough paper around each hole.
To make paired limbs, draw one arm and trace it for the second. You can also fold a manageable piece of cardstock once and cut through two layers, but only if the scissors move through the folded paper comfortably. Matching pieces are optional; one long arm and one short arm can make a much more memorable monster.
How to make easy paper puppets with cardstock and brads
1. Draw and cut the five main pieces
Sketch the body and limbs in pencil, keeping each part comfortably larger than the intended joint. Cut on the lines. If the child is still developing scissor control, an adult can cut the body while the child cuts simple rectangular arms and legs.
Do not add tiny hands, shoes or antennae yet. Those details can make the cutting frustrating and may catch while the puppet moves. Draw them later or glue on larger accessories after the joints work.
2. Arrange the puppet before making holes
Put the body faceup and slide each limb behind it. Overlap the top of each limb with the body far enough to leave paper around the future hole. Move the pieces through a pretend wave or kick. If a limb collides with another part, change its angle or shorten it now.
Mark the center of each overlap in pencil. Four movable limbs require four joint marks and four brads. A simplified puppet with only two movable arms needs two of each.
3. Have an adult make the joint holes
Place one limb behind the body in its final position. An adult should pierce or punch through both overlapping layers together so the holes line up. Work on a protective surface and keep hands away from the point. Repeat for the remaining joints.
If a standard hole punch cannot reach the mark, the adult can use an appropriate paper-piercing tool. The hole only needs to admit the brad stem; an oversized hole can make the joint wobble or tear sooner.
4. Attach and adjust the brads
Insert each brad from the front through the body and limb. Turn the puppet over and spread the two legs of the fastener on the back. Open them enough to keep the pieces together, but do not clamp the joint so tightly that the limb cannot rotate.
Test every limb. If one sticks, slightly relax the fastener on the back. If it swings too freely, flatten the legs a little more. Check that the fastener legs lie flat and that no sharp edge is raised.
5. Decorate without blocking the joints
Now add a face, clothing, scales, feathers, control buttons or spots. Markers and crayons keep the activity quick and low-mess. Glue-on decorations are fine, but keep them away from the rotating joints and allow wet glue to dry before vigorous play.
Give the finished character a name and a reason to move. It might wave hello, demonstrate emotions, march in a parade or act out a short story. A few simple prompts often extend the activity longer than adding more craft materials.
Make the craft easier for younger makers
For preschool-age makers over 3, simplify the construction rather than expecting them to complete every tool-based step. An adult can precut the body and limbs, mark the overlaps and prepare the holes. The child can choose colors, draw the face, arrange the pieces and suggest how the character should move. Continue close supervision because the brads remain small parts.
- Use only two moving arms instead of four limbs.
- Choose a monster so uneven shapes look intentional.
- Offer markers rather than small glued embellishments.
- Prepare one color of cardstock and a limited selection of drawing tools.
- Place each brad into a small adult-controlled container as soon as it is removed from the package.
- Count the brads before and after the activity.
Extend the puppet for older children
Once the basic joints work, older makers can add complexity one feature at a time. Extra parts require extra holes and fasteners, so test the movement after each addition rather than assembling everything at once.
- Add a movable jaw, tail, wing, antenna or second arm section.
- Draw a happy face on one side and a surprised face on the other.
- Attach a wide craft-stick handle to the back with glue, keeping it clear of the joints.
- Create removable paper hats or accessories.
- Make two characters and write a six-line puppet-show script.
- Design a background from a cardboard box or folded sheet of heavy paper.
- Use different limb shapes to show a robot, animal and person moving in different ways.
Troubleshoot common puppet problems
| Problem | Likely cause | Practical fix |
|---|---|---|
| A limb will not move | The brad is pressed too tightly | Loosen the fastener legs slightly on the back. |
| The holes do not align | The pieces were pierced separately | Return the pieces to their final overlap and have an adult pierce both layers together. |
| The joint starts tearing | There is too little paper around the hole or the paper is flexible | Glue a small cardstock circle over the damaged area, let it dry and remake the hole. |
| The limb flops or twists | The limb is long or the hole is oversized | Shorten the limb or add a reinforcement circle with a closer-fitting hole. |
| Pieces catch on each other | The joints are too close together | Trim the interfering edge or change the resting angle of the limb. |
| Decorations block movement | Paper or glue overlaps the joint | Trim the decoration and keep future additions clear of the rotating area. |
Keep cleanup short and controlled
Use one tray for offcuts from the beginning instead of letting scraps spread across the table. Return markers to their container as colors are finished. Most importantly, gather every unused or dropped brad before anyone leaves the work area. Count the remaining fasteners, check the floor and store them where children under 3 cannot reach them.
Can you cut the puppet with a Cricut?
Yes, although a cutting machine is optional. Build the puppet from large circles, ovals, rounded rectangles and other simple shapes. Keep the joint areas broad, and add holes only if you are confident that their size suits your fasteners. Cricut advises choosing the applicable cardstock setting and making a test cut because results can vary by material. A failed test shape wastes much less paper than a complete set of puppet pieces.
Make one moving character first
The best first version is intentionally simple: one body, four limbs and four brads. Let the child direct the character design while an adult controls the piercing tool and manages the fasteners. Once the joints swing easily, decoration and storytelling can do the rest.
Start with a monster or robot if anyone feels unsure about drawing. Five broad shapes are enough, and every unusual cut can become part of the character rather than a mistake.