
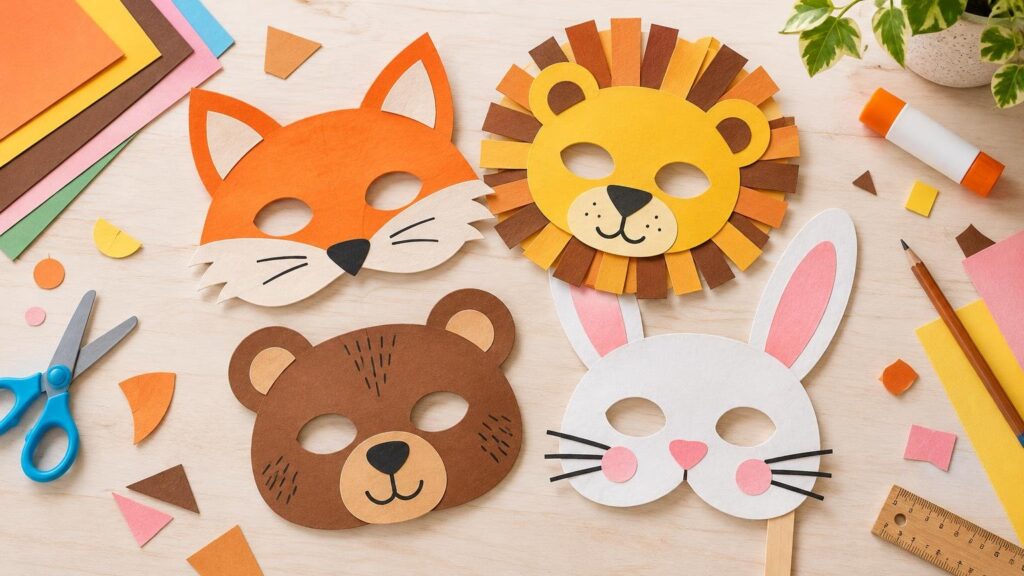
TLDR: To make easy cardstock animal masks kids can finish without a printer, cut one rounded mask base, add roomy eye openings and let children build an animal with large ears, spots, muzzles or feathers. Attach a craft-stick handle instead of a tie for the simplest fit. Adults should handle eye openings and any difficult cutting.
The best part of this project is that every mask starts the same way. A plain cardstock base can become a cat, dog, fox, lion, bear, bunny, owl or frog. Children do not need to follow a detailed template, and mismatched ears or oversized spots simply give the animal more personality.
Why this low-mess mask craft works
This project uses broad shapes rather than tiny pieces. That makes the masks easier to cut, arrange and glue. It also gives children a real creative decision: they choose the animal and decide which features make it recognizable.
A handled mask is the easiest version. Children can lift it for pretend play and lower it whenever they need an unobstructed view. There is no strap to measure, knot or adjust. If a child does not want anything near their face, the finished animal can become a puppet or room decoration instead.
Cardstock holds ears and other raised features better than ordinary printer paper, but it should still be comfortable to cut. If you are deciding what to use, the practical comparison of 65 lb, 80 lb and 100 lb cardstock for paper crafts explains how heavier sheets affect cutting and layering. Use whatever manageable cardstock you already own rather than treating a particular weight as mandatory.
Supplies: keep them simple
- One sheet of cardstock for each mask base
- Cardstock scraps or construction paper for animal features
- Child-appropriate scissors
- Pencil and eraser
- Water-based white glue or a glue stick labeled for the child’s age
- Crayons, washable markers or colored pencils
- One smooth craft stick or a tightly rolled cardstock handle per mask
- Paper tape or glue for attaching the handle
- Optional paper stickers, yarn whiskers or large paper shapes
Water-based white glue is a sensible choice when cardstock layers need a stronger hold. Health Canada recommends water-based white glue instead of solvent-based adhesives for children’s projects. Follow the product label, use only a small amount and supervise the activity.
For lighter decorations, a glue stick can reduce drips and drying time. Keep embellishments flat and lightweight around the eye area. Heavy decorations can make a handled mask tilt or cause a tie-on version to slide.
Choose a hand-held or tie-on mask
Hand-held mask
A hand-held mask is the low-friction choice for homes, classrooms and parties. Glue or tape a smooth craft stick to the lower side or back edge. Position it where the child’s hand will not cover an eye opening. A tightly rolled strip of cardstock can replace a wooden stick if necessary.
Optional tie-on mask
An adult can make a tie-on version by punching one hole near each side and adding ribbon or soft yarn. Fit it individually and keep the ties short enough to manage. The mask should sit securely without pressing against the eyes. Treat elastic and ties as optional, not as requirements for completing the craft.
Do not let a child run while wearing a mask. Crayola’s consumer craft safety guidance says handcrafted masks should not obstruct vision or hearing, impede movement or be used near an open flame.
How to make easy cardstock animal masks for kids
1. Cut the basic shape
Place a sheet of cardstock horizontally. Draw a wide oval, rounded rectangle or gently curved shield shape. It only needs to cover the area from the forehead to just above the mouth. Leaving the mouth uncovered makes speaking and breathing easier and eliminates the need to cut a mouth opening.
For a child-sized base without a template, use a pair of the child’s well-fitting glasses or sunglasses as a rough width guide. Draw the base slightly wider than the frames. If glasses are unavailable, cut a generous paper oval and trim its sides after holding it near the child’s face. Make all pencil marks while the paper is away from the face.
2. Make and check the eye openings
An adult should cut the eye openings before the decorating begins. Glasses can also help with placement: trace around the lenses loosely, then draw smaller rounded openings inside those outlines. Without glasses, lightly mark two evenly spaced horizontal ovals and begin smaller than you think you need.
To start an opening, an adult can gently fold the cardstock at the center of the drawn oval, make a small snip and unfold it. Cut outward to the line. Do not use a craft knife while children are participating.
Have the child remain still while an adult holds the undecorated mask in position. Check forward and side vision through both openings. Remove the mask before enlarging or reshaping anything. Repeat until the child can see comfortably without moving the mask around. Visibility matters more than perfectly matching eye holes.
3. Add large animal features
Cut or provide a small selection of basic shapes: triangles, circles, ovals, long leaf shapes and narrow strips. Let the child arrange everything before gluing. This makes it easy to move an ear, change an expression or turn an intended bear into a cat.
4. Decorate and assemble
Color the base first so glued pieces do not get in the way. Add ears, a muzzle, spots, feathers or a mane, keeping decorations clear of the eye openings. Use dots or thin lines of glue rather than puddles. Press the layers flat, attach the handle and leave the mask on a level surface until the glue holds.
Mix-and-match animal features
| Animal | Main shapes | Easy identifying detail |
|---|---|---|
| Cat | Two triangle ears and an oval muzzle | Draw whiskers and a small triangle nose |
| Dog | Two floppy oval ears and a rounded muzzle | Add one large paper spot |
| Fox | Two tall triangle ears and pointed cheek shapes | Use a contrasting muzzle and ear centers |
| Lion | Two round ears and strips or loops around the edge | Make a paper mane in a second color |
| Bear | Two round ears and a broad oval muzzle | Add small inner-ear circles |
| Bunny | Two long oval ears and a small muzzle | Draw whisker dots and two front teeth |
| Owl | Two large rings around the eyes and a triangle beak | Layer several broad feather shapes |
| Frog | Two raised circles along the top edge | Add dark pupils and a wide curved smile |
Keep the features bold. Two large ears communicate more clearly than several tiny details, and large pieces are easier for young hands to position. If a feature extends above the base, glue a second scrap behind the joint to reinforce it.
The simplest version: a cat mask
A cat is an easy starting point because it requires only a few familiar shapes. Prepare one rounded base, two large triangles for ears, two smaller triangles for the inner ears and one oval for the muzzle.
- Color the rounded mask base.
- Glue one large triangle behind each upper corner.
- Place the smaller triangles inside the ears.
- Glue the oval muzzle below the eyes.
- Draw a triangle nose, a short mouth and three whiskers on each side.
- Attach a handle after the front is decorated.
To change the same pieces into a fox, make the ears taller, use a pointed muzzle and add contrasting cheek sections. For a bear, replace the triangles with circles. This is the central idea of the project: preserve the base and change only the features.
Make it easier for preschoolers and non-cutters
Pre-cutting the base and eye openings turns this into an arranging, coloring and gluing activity. Prepare large feature shapes in shallow trays, but avoid sorting them into rigid animal kits. A mixed tray of ears, circles and spots invites children to invent animals rather than copy one result.
Young children can choose colors, place pieces and draw facial details even when an adult does all the cutting. Children who find glue bottles difficult can use a glue stick, adhesive paper shapes or ordinary paper stickers. For a special group activity, adults could also prepare custom stickers with children’s names or a simple event design, then let each child add one to the back of the finished mask.
Scissor readiness varies. Crayola’s manufacturer guidance distinguishes blunt-tip scissors for children ages four and older from pointed-tip scissors for children ages six and older, but age guidance does not replace an adult’s judgment about an individual child’s skills and supervision needs. The American Academy of Pediatrics guidance on choosing safe craft supplies also recommends following labels and supervising children when they use art materials.
Classroom, camp and party preparation
For a group, do the precision work before the children arrive. Cut one base per child, complete all eye openings and provide a few extras. Sort large features by shape rather than animal so participants can make original combinations.
- Put one base, one handle and a small scrap bundle at each place.
- Set out shared trays of ears, circles, ovals and paper strips.
- Use one glue container for every few children instead of crowding the table.
- Write each child’s name on the back before decorating begins.
- Create a finished sample for construction reference, but offer more than one animal idea.
- Reserve a flat table or shelf for drying masks.
- Keep an envelope or shallow box for reusable scraps.
A paper plate can replace the cardstock base when a group needs even less preparation, although its curved rim changes how features sit. See paper plates versus cardstock for young children for the practical differences. If the children want to continue the pretend-play theme, leftover shapes can also become easy cardstock puppets with movable parts.
Optional cutting-machine preparation
A cutting machine can help an adult prepare matching bases for a large group, but it is not necessary for this project. Use a simple rounded shape with generous eye openings rather than a detailed animal file.
Material behavior varies, so Cricut recommends making a test cut and adjusting settings when necessary. Test one complete base before loading the rest of the cardstock. Confirm that the sheet releases cleanly and that narrow areas around the eyes do not tear. Keep the machine and loose cut pieces in an adult-controlled preparation area.
Mask safety and supervision
Choose supplies labeled for the child’s age and follow their directions. A statement of conformance to ASTM D4236 indicates that an art material has undergone toxicological review for chronic hazards, but the U.S. Consumer Product Safety Commission explains that this statement does not replace product directions or age guidance.
- Adults should cut eye openings and supervise scissor use.
- Check visibility with the plain mask and check it again after decorating.
- Keep paper, masks and decorations away from candles and other open flames.
- Do not cover the child’s mouth or restrict hearing.
- Use a handle when a tie-on fit is uncertain.
- Remove loose scraps and dropped tools before children begin pretend play.
- Stop using a mask if it bends into the eyes or a decoration comes loose.
Quick cleanup and scrap-paper ideas
Place a tray or sheet of scrap paper under each work area. It catches glue marks and gives children a defined place to keep small pieces. Put caps back on markers and glue as soon as decorating ends, then move masks to the drying area before wiping the table.
Save scraps large enough to become ears, noses or spots. Very small pieces can be used for a paper mosaic, while long strips can become whiskers, lion manes or loops for an owl’s feathers. Discard glue-covered scraps that cannot be reused. A labeled envelope keeps the remaining pieces flat for the next project.
A simple next step
Begin with a handled cat, bear or bunny mask because each uses only a base and a few large shapes. Prepare the eye openings yourself, then hand over the creative decisions. Once children understand how ears, colors and facial details change the animal, the same easy setup can produce an entire cast for stories and pretend play.