
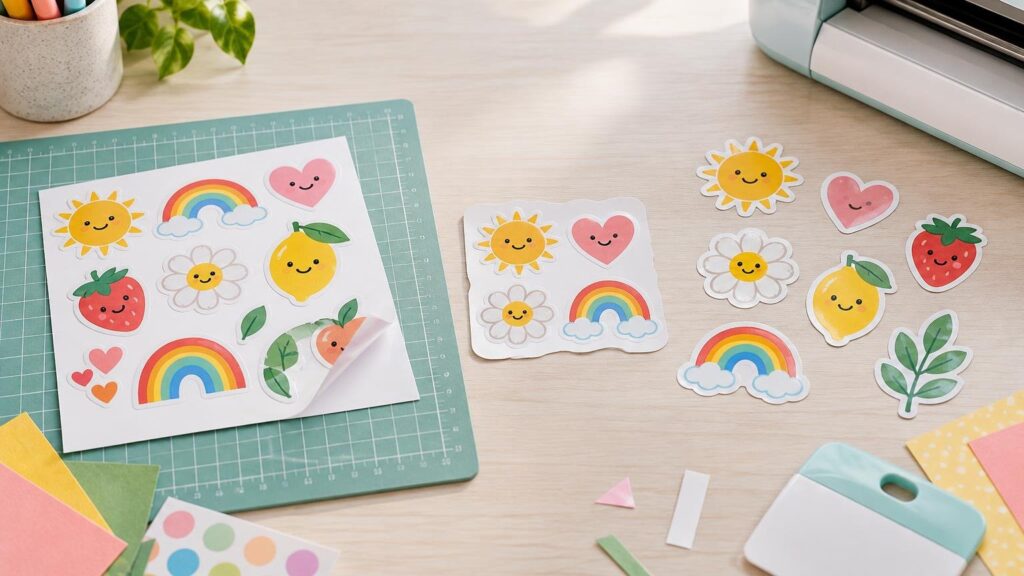
TLDR: Choose a kiss cut when you want stickers to peel from one intact backing sheet. Choose a die cut when each sticker should be separated with its own backing. For an individually handled sticker that is especially easy to peel, use a kiss cut with a larger die-cut edge when that option is available. The safest approach to kiss cut vs die cut Cricut stickers is to test the complete material stack rather than rely on one universal pressure setting.
The important difference in kiss cut vs die cut Cricut stickers is not the artwork—it is what happens to the liner underneath. A kiss cut passes through the printable face while leaving the liner intact. A die cut passes through both layers, releasing the sticker and its backing as one separate piece. Cricut uses these definitions in its Create Sticker guidance.
That small change controls how the finished project is stored, peeled, distributed, and used. Planner icons and classroom rewards are usually easier to manage on a kiss-cut sheet. Party favors, gift extras, and package inserts are usually easier to hand out as individual die-cut stickers.
Kiss cut vs die cut Cricut stickers at a glance
| Cut style | What gets cut | Finished format | Best for | Handling |
|---|---|---|---|---|
| Kiss cut | Printable sticker layer only | Multiple stickers remain on one liner | Planner sheets, reward stickers, themed sets and small shapes | Easy to store as a sheet |
| Die cut | Sticker layer and liner | Each sticker has its own shaped backing | Giveaways, party favors, package inserts and gift extras | Easy to distribute individually |
| Kiss cut with die-cut edge | Sticker face is kiss cut; a larger outer edge cuts through the liner | Individual piece with a peel-away outer area | Standalone stickers that need a convenient peeling edge | Individual like a die cut, but the sticker peels from a larger backing piece |
What cut depth means in practice
A kiss cut is not simply a “light” cut, and a die cut is not simply a “heavy” cut. The correct depth depends on the full stack passing under the blade: printable coating, adhesive, liner, ink, and any laminate you have added. Blade condition, material variation, mat grip, and the selected material setting can also change the result.
For a successful kiss cut, the blade must pass cleanly through the sticker face and adhesive without slicing through the liner. The sticker should peel easily, but the sheet should remain together when lifted from the mat. For a die cut, the cut must pass through the liner cleanly enough that the individual piece separates without tearing or needing to be pulled free.
There is no dependable pressure number for every machine and sticker material. Begin with the current setting recommended for the specific material, then run a test cut. Cricut likewise recommends choosing the matching material setting and testing before committing to a project. If you frequently remake designs, record the printer, paper, laminate, blade, setting, and pressure adjustment alongside the project using a system for organizing Cricut project files and test notes.
When a kiss cut is the better choice
Choose a kiss cut when the liner acts as the organizer for the project. One sheet can hold many small stickers without loose backing pieces filling a drawer or envelope. This makes kiss cuts particularly useful for planner icons, chore-chart stars, classroom rewards, labels, decorative sets, and small detailed shapes.
A sticker sheet also lets you arrange related designs as a collection. You might place seven weather icons on one planner sheet, make a group of expressions for a journal, or produce a coordinated set for a DIY reward sticker chart for kids. The intact liner helps keep every piece together until it is needed.
The tradeoff is distribution. If five people each need one sticker, you must either pass around the entire sheet or trim the liner into smaller sections. That makes a conventional sticker sheet less convenient for party bags, event handouts, order packaging, or individual gifts.
When a die cut is the better choice
Use a die cut when every sticker needs to function as a separate object. The sticker and its shaped backing come off the mat together, ready to place in a card, favor bag, product package, or gift. There is no need to trim a larger sticker sheet after cutting.
Die cuts work well for birthday handouts, club stickers, thank-you inserts, handmade gift extras, and small batches of promotional artwork. They are also easier to count and divide among recipients. If you need a much larger quantity than you want to print and cut at home, ordering custom stickers is another production option rather than repeating the same Cricut workflow across many sheets.
A die cut does require enough depth to penetrate the liner, so it places more emphasis on a clean test. Too little pressure leaves the sticker attached by uncut sections. Too much pressure can mark the mat, encourage curling, or make delicate outlines harder to remove neatly.
The third option: a kiss cut with a die-cut edge
Some projects benefit from combining both approaches. Cricut’s Create Sticker guidance describes an optional die-cut edge around a kiss-cut sticker. The sticker itself peels from a larger outer piece, while the outside perimeter cuts through the liner.
This is not the same as a full sticker sheet because each finished item is separate. It is also not a conventional die cut that follows the sticker’s exact outer edge through every layer. The larger backing area gives the recipient a visible border to hold and can make it easier to find the edge of the sticker.
Feature availability and interface details can vary by Design Space version, platform, or account. If Create Sticker or the specific edge option does not appear, you can still build a similar result by preparing separate inner and outer cut lines, but the exact setup should match your current software workflow.
Choose the material before choosing the setting
Paper-based printable sticker media is a practical choice for journals, planners, cards, reward charts, and other indoor projects that will not receive much moisture or abrasion. Cricut’s Printable Sticker Paper is designed for inkjet printing; the company warns against using that product in a laser printer. Its blank face is the printable side, while the gridded or logo side is the liner. Cricut recommends a LightGrip mat and Fine-Point Blade for that specific paper.
Do not extend those instructions automatically to every third-party paper or vinyl. Check the material maker’s printer compatibility and cutting guidance. A product may have a different liner thickness, adhesive, coating, or finish even when its packaging uses similar terms.
For items likely to encounter moisture, a compatible printable vinyl and laminate system may be more appropriate. Cricut’s Printable Waterproof Sticker Set combines printable vinyl with a separate laminating sheet. Its instructions say to let the printed ink dry before applying the laminate and recommend handwashing decorated items rather than treating them as dishwasher-safe. That guidance applies to the named Cricut set; it does not mean every printable vinyl or homemade laminated sticker is waterproof.
Adding laminate changes the stack thickness. Even if an unlaminated sheet cut perfectly yesterday, repeat the test after laminate is added. Glossy surfaces can also affect printing, handling, or sensor performance, so use products described as compatible with your machine and workflow.
A reliable Print Then Cut workflow
- Prepare the artwork at its intended finished size. Leave enough space between designs for their offsets and cut paths.
- If a multilayer design should print as one image with one outer cut line, use Flatten. Cricut explains that using Attach instead may leave the machine cutting around individual design elements.
- Print on the correct side of the material using a compatible printer. For Cricut Printable Sticker Paper, the manufacturer recommends high, best, or photo-quality printing, while noting that a lower quality setting may help if excess ink smudges.
- Allow the print to dry as required. Apply laminate only if it is part of the chosen material system, following that product’s instructions.
- Place the printed sheet on the mat in the orientation shown in Design Space. Smooth it down without wrinkling the printable face or registration area.
- Choose the closest matching material setting and make a small test using the complete stack.
- Inspect the test result before cutting the full design. If possible, keep the mat loaded until you know whether another pass is needed.
If Print Then Cut is new to you, review the broader process in Getting Started with Cricut for Crafting before using a valuable specialty sheet.
How to test the cut without wasting a sheet
Use an offcut that includes every layer in the real project, or place a tiny test shape in an unused margin that will not interfere with the printer registration area. A circle or rounded square is easier to evaluate than an intricate design.
Testing a kiss cut
- Peel the test sticker from one corner.
- Confirm that the printable layer releases without tearing.
- Check that the liner remains intact and reasonably flat.
- Increase pressure or choose an appropriate stronger setting only if the sticker face is not fully cut.
- Reduce pressure or use a lighter compatible setting if the liner is being sliced.
Testing a die cut
- Lift the surrounding waste gently and check whether the piece separates cleanly.
- Look for uncut fibers or sections that still connect the sticker to the sheet.
- Increase pressure gradually if the liner is not fully cut.
- Avoid excessive pressure once the piece releases consistently; a deeper cut is not automatically a better cut.
Whenever you change the paper, laminate, blade, or machine, treat the combination as a new stack. Even visually similar materials can require different settings.
Troubleshooting common sticker-cut problems
The backing was cut during a kiss cut
The selected setting or pressure is too aggressive for that stack, or the liner is thinner than the material used for the previous test. Move to a lighter compatible setting or reduce pressure, then test again. Also verify that you did not accidentally choose a die-cut option.
The sticker will not peel or separate
First check whether the blade completed the entire outline. A worn or dirty blade, unsuitable setting, thick laminate, or material that is not firmly adhered to the mat can leave incomplete sections. Increase pressure cautiously only after checking those basics.
Cricut cuts around every internal element
Inspect how the artwork was prepared. Cricut says Flatten makes printable layers behave as one printed image with an outer cut line, whereas Attach can cause individual elements to retain their own cut paths.
The print smudges
Confirm that you are printing on the coated printable face, allow adequate drying time, and check the printer and media instructions. Too much ink can contribute to smudging; Cricut specifically notes that lowering print quality may help with excess ink on its Printable Sticker Paper.
The cut line is shifted away from the artwork
Check that the sheet is positioned as shown in Design Space and that the registration area is clean and unobstructed. If misalignment continues, run the applicable Print Then Cut calibration. Cricut provides calibration as a way to address alignment issues.
Handle the finished stickers according to their format
Leave kiss-cut sheets intact when the main benefit is organization. If you want a polished sheet, trim only the outside perimeter after cutting the individual stickers. When removing paper-based material from a mat, bend the mat away from the sheet rather than pulling the sheet upward aggressively; this can help limit curling.
Sort die-cut pieces before discarding the surrounding waste so that small stickers do not disappear with the scraps. Store finished pieces flat in an envelope or shallow container. For gifts and handouts, a kiss cut with a die-cut edge offers a useful middle ground: it remains an individual piece while providing a larger backing area to grip.
The practical choice
Choose according to the finished format you need. Use kiss cuts for organized sheets, die cuts for separate handouts, and a kiss cut with a die-cut edge when you want an individual sticker with an easy-peel backing area. Then test the exact paper, liner, ink, and laminate combination before cutting the full project. That short test is more useful than any universal pressure recommendation—and much cheaper than sacrificing a complete printed sheet.
References
- How to use Create Sticker in Design Space – Help Center
- How do I choose material settings? – Help Center
- Which materials can I cut with my Cricut smart cutting machine? – Help Center
- Printable Sticker Paper – Help Center
- Printable Waterproof Sticker Set Instructions – Help Center
- How to Print Then Cut in Design Space – Help Center
- Calibrating your machine for Print Then Cut – Help Center